DIY Three Bay Compost Bin: Turn Waste Into Garden Gold
- Herman Kraut

- Mar 7
- 8 min read
Compost is the quiet engine behind every productive garden. Without healthy soil, even the best seeds and plants struggle to thrive. When we first arrived on our land in Portugal, I knew compost would eventually become the backbone of our vegetable garden.
Like many beginner projects on a homestead, the first attempt didn’t go quite as planned.
During our first year, I stacked three pallets together at the end of our veggie terrace along the fence line and started a compost pile. A neighbor even gifted me a handful of red wiggler worms to kickstart the process.
The problem? We simply didn’t have enough biomass yet. The pile stayed small, the summer sun dried it out, and the compost never really got going.
Instead of forcing the system, I pivoted. The worms moved into a bathtub inside our mobile home and became a small worm farm. Over the next two to three years they multiplied like crazy.

Now, in February 2026, it finally felt like the right time to try composting again. This time with more experience, more organic material, and a better system.
So I built a DIY three bay compost bin using reclaimed wood from our stone house renovation.
And hopefully, this one will turn garden waste into black gold for years to come.
Why Compost Is the Heart of a Self-Sufficient Garden
Composting is one of the simplest ways to close the nutrient loop on a homestead.
Instead of exporting organic material, you recycle it back into the soil.
Kitchen scraps become worm food.Garden waste becomes fertilizer.Leaves and branches become long-term soil structure.
Healthy compost improves:
soil fertility
water retention
microbial life
plant resilience
In Mediterranean climates like ours in Central Portugal, compost is especially valuable. Summers are long and dry, which means soils can lose organic matter quickly.
Adding compost helps soil hold moisture longer and protects plants from drought stress.
In permaculture, compost is often called “a soil factory.” Once you build the system, it keeps producing fertility year after year.
Why a DIY Three Bay Compost Bin Works Better Than a Single Pile
A single compost pile works, but it has limitations. As soon as you add fresh kitchen scraps or grass clippings, you disturb the decomposition process of older materials.
A three-bin compost system solves that problem. Each bin serves a different purpose.
Bin 1 – Fresh Material
This is where new compost ingredients go.
Kitchen scraps
grass clippings
garden waste
cardboard
The pile slowly grows as you add new material.
Bin 2 – Active Compost
Once the first bin is full, the material gets moved to the middle bin.
Turning the pile introduces oxygen and mixes the ingredients. Microbes and worms begin breaking everything down more efficiently.
This is where most decomposition happens.
Bin 3 – Finished Compost
After several months, the compost matures into dark, crumbly soil.
This finished compost can then be harvested and used in garden beds, vegetable terraces, or greenhouses.
The three-bin system creates a continuous compost cycle. While one pile matures, another one grows.
Building the DIY Three Bay Compost Bin From Reclaimed Wood
Rather than buying new materials, I used what we already had lying around the property.

When we removed the roof of our granite stone house during renovation, a pile of old roof rafters remained. Instead of burning or discarding them, they became the frame for the compost system.
The result is a simple but sturdy structure.
Each compost bay measures:
1 m × 1 m (3.3 ft × 3.3 ft)
The sides are about:
1.2 m (4 ft) high

Materials Used
Most of the materials were reclaimed from previous projects.
old roof rafters from the stone house
larch boards used as vertical supports
cinder blocks for the base
random screws from my tool box
cardboard for the bottom layer
leftover wood fibre insulation from the house renovation
an old metal door used as a cover
The cinder blocks sit directly on soil and raise the compost bins slightly off the ground. This improves airflow and helps prevent wood from rotting too quickly.

For the structure, I mounted vertical larch boards at the corners and screwed the old rafters horizontally between them.
Small gaps between the boards allow airflow while still holding the compost inside.
At the moment the front remains open. Later I may add removable boards or mesh if needed.
As with most homestead systems, it will evolve over time.
Starting the First Compost Layers
Once the structure was ready, it was time to start filling the bins. The first layer at the bottom acts like a sponge and helps retain moisture.
I added:
cardboard sheets
pieces of wood fibre insulation
These materials absorb water and slowly break down into organic matter.
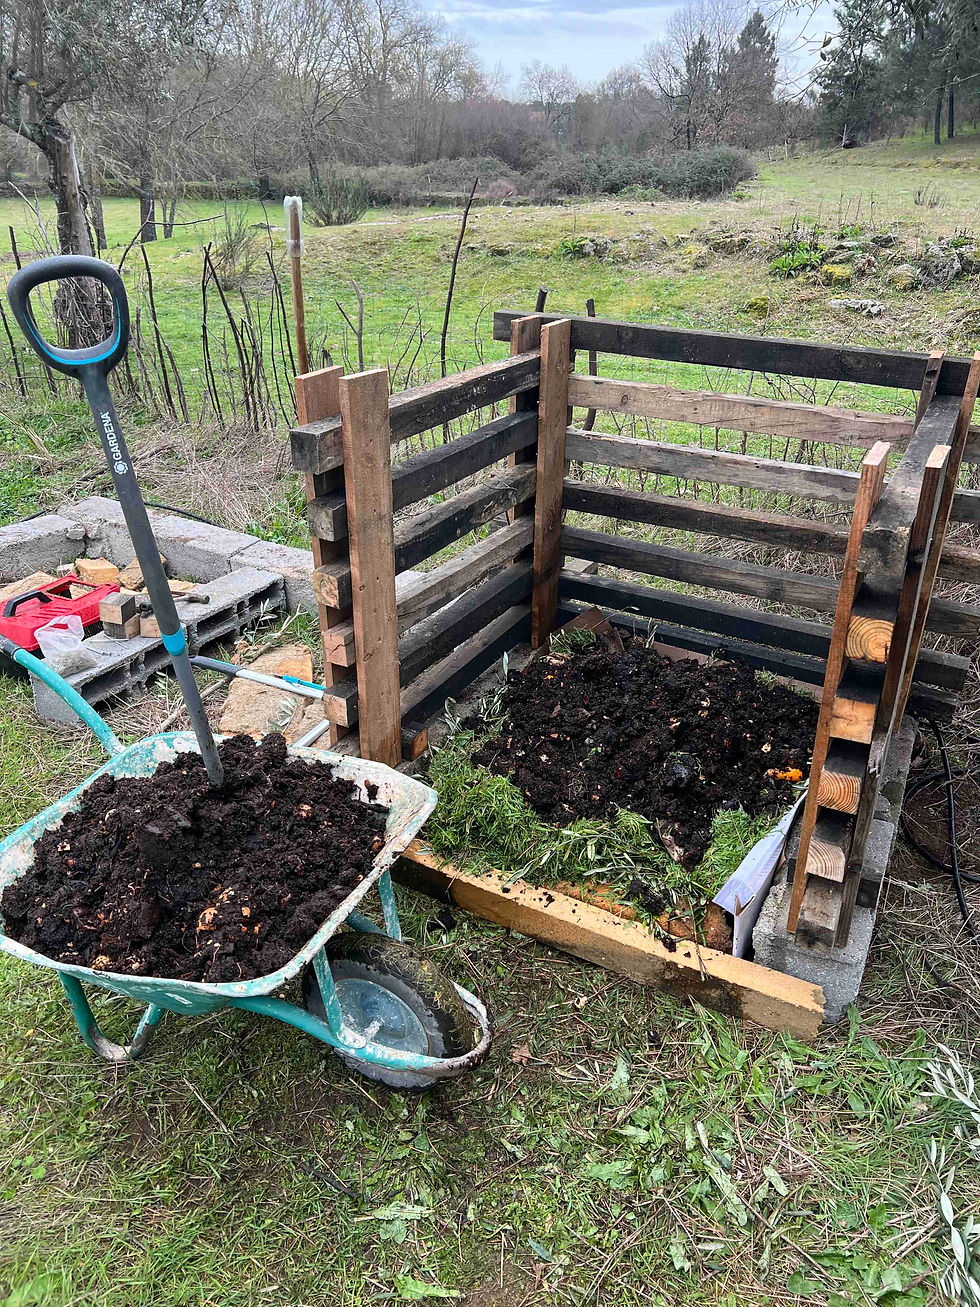
Next came a coarse layer of olive branches that we had pruned from our trees. Larger branches improve airflow inside the compost pile and prevent it from compacting.
Then the real magic ingredient arrived.
Two wheelbarrow loads of compost and worms from the bathtub worm farm. Those worms have been multiplying for years, so the compost bin received thousands of new workers on day one.

After that I added:
grass clippings
garden debris
additional cardboard
Everything was soaked thoroughly with a garden hose to kickstart decomposition.

The left bin currently stores older branches and carbon-rich materials from last year’s olive pruning. These will eventually be mixed into the active compost pile.
From Bathtub Worm Farm to Outdoor Compost System
The bathtub worm farm started as a backup plan after the first compost pile failed. But it turned out to be incredibly valuable.
Red wigglers reproduce quickly under the right conditions. Over the past few years they multiplied into a large population.

Instead of shutting down the worm farm, I plan to keep it running as a worm nursery.
Whenever the outdoor compost bins need a boost, I can simply add another batch of worms and worm castings.
This approach keeps the compost ecosystem alive and thriving.
The Plan for the Compost Cycle
The new system will work like this. The right bin becomes the active filling bay.
Kitchen scraps, grass clippings, and garden waste will be added there regularly. Once the pile grows large enough, the materials from the side bins will be moved into the center bin and mixed together.
This turning step introduces oxygen and accelerates decomposition. After several months, the middle pile should transform into finished compost ready for the garden.
To protect the compost from drying out in the summer sun, I currently cover the active bin with an old metal door salvaged from our stone house.
Sometimes the simplest solutions are the best ones.
Future Soil Building Experiments
Composting is only the beginning of our soil-building strategy. Over the next few years I plan to expand the system with several additional methods.
A vermicomposting toilet could use worms to help treat black water safely and turn waste into nutrients. Large barrels filled with comfrey tea or stinging nettle tea can produce liquid fertilizers for vegetable beds. And of course, the three-bin compost system will keep producing rich compost soil for the greenhouse and veggie terrace.
All of these systems follow the same principle. Waste becomes resource.
Small Systems Create Big Soil
A compost bin may not look impressive compared to fruit trees, greenhouses, or irrigation systems.
But in reality, compost is one of the most powerful tools in a regenerative garden. Every leaf, grass clipping, and kitchen scrap becomes part of the soil cycle.
For us, the journey started with a failed pallet compost pile, continued with a bathtub worm farm, and finally evolved into a DIY three bay compost bin built from reclaimed materials.
If everything goes according to plan, this simple structure will produce compost soil for many seasons to come.
And every wheelbarrow of compost will feed the next generation of plants growing on our land.
That’s how resilience grows. One pile of organic matter at a time.
Herman’s Tough Kraut Fixes: Common Challenges Building a DIY Three-Bay Compost Bin
Composting looks simple on paper, but real piles sometimes behave differently. This troubleshooting FAQ covers common issues gardeners encounter when building a DIY three bay compost bin and how to fix them quickly.
Q: Why is my compost pile not breaking down?
A: The most common reason is an imbalance between “greens” and “browns.” Greens include grass clippings and kitchen scraps, while browns include cardboard, leaves, and wood chips. If the pile contains too much dry material, decomposition slows dramatically. Add fresh greens and water the pile lightly to restart microbial activity.
Q: Why does compost smell bad?
A: A rotten smell usually means the pile lacks oxygen. Compost organisms need airflow to function. Turning the pile or adding coarse materials like branches can restore airflow and eliminate the odor.
Q: Why is the compost pile too dry?
A: In Mediterranean climates, compost piles can dry out quickly in summer. Covering the pile with cardboard, straw, or a lid helps trap moisture. Water the pile occasionally so it feels like a wrung-out sponge.
Q: Should worms be added to compost?
A: Red wigglers accelerate decomposition and produce nutrient-rich worm castings. Adding worms from a vermicomposting bin is an excellent way to boost microbial life and speed up compost production.
Q: How long does compost take to finish?
A: Depending on materials, temperature, and turning frequency, compost can mature within three to six months. Finished compost should look dark, crumbly, and earthy rather than recognizable as food scraps or leaves.
Recommended Books & Resources
Books
The Rodale Book of Composting (Revised Edition) by Grace Gershuny & Deborah L. Martin
Often considered the composting “bible,” this book explains everything from simple backyard piles to advanced compost systems. Clear instructions and troubleshooting make it ideal for gardeners who want to turn everyday waste into high-quality soil.
The Composting Handbook: A How-To and Why Guide to Composting by Robert Rynk
A practical deep dive into how compost actually works. Perfect for readers who want to understand the science behind decomposition, temperature cycles, and how to speed up the compost process.
Let It Rot! The Gardener’s Guide to Composting by Stu Campbell
A classic beginner-friendly composting guide that explains how to build piles, balance greens and browns, and troubleshoot common problems without overcomplicating the process.
Worms Eat My Garbage by Mary Appelhof
If the worm farm part of this article sparked your interest, this is the go-to guide for vermicomposting. It explains how red wigglers turn kitchen scraps into nutrient-rich worm castings and how to maintain healthy worm bins.
Resources
REOTEMP Backyard Compost Thermometer (20")
Monitoring compost temperature so you know when the pile is actively decomposing and when it needs turning. A simple tool that removes the guesswork from composting.
Bosmere Compost Aerator Tool
Quickly mixing and aerating compost piles without heavy shoveling. This tool pulls oxygen into the pile, which speeds decomposition and helps prevent foul odors.
REOTEMP Compost & Soil Moisture Meter
Checking moisture levels inside compost piles and garden beds. Most gardeners have never heard of this tool, but it’s incredibly useful for keeping compost at the perfect “wrung-out sponge” moisture level.
Tough Kraut Resources
Explore our recommended resources for a curated collection of composting tools, soil-building guides, and field-tested gear we use on our own land to turn everyday organic waste into thriving garden soil.


Comments